


650GS mono: Chequeo de valvulas (English)
2 participantes

 650GS mono: Chequeo de valvulas (English)
![]() urbandrag 15/3/2013, 07:57
urbandrag 15/3/2013, 07:57
Lo iba a traducir pero no es mi culpa que sean linguisticamente limitados a esta altura del nuevo milenio.
G650GS (F650GS single) valve check
This is one of those maintenance items that has to be done, yet, for some strange reason, I've been really dreading to do it. Normally, I do all my engine work on my bikes, but I've been reluctant to dive into the BMW. Why? I'm not sure. After all, it is a machine and like all machines it can be serviced. So, here I was at 12k miles, thinking about paying the dealer $300 for valve check and whatnot, and then I decided to do it myself.
At first look, the layout of the BMW is a little intimidating, I'll admit that. Unlike all my previous bikes, this one has way too many electronic gizmos, hoses, tubes, and things are rather inaccessible. So, I took my time and started slowly, taking pics along the way. This will be a two-post series dealing with valve check on a BMW 650GS single cylinder, two spark motor. IIRC, this is the same for 04-07 F650GS and 09 G650GS, along with a few other models using the same motor.
First step in doing almost anything maintenance related on this bike is to remove the plastic covers. A few torx bolts and it's done, so there is no need for pics.
Next, remove the oil tank by unscrewing one Torx bolt and removing two clips. At the same time, remove air intake snorkel. The snorkel has a clipped in temp sensor (leave it in place or remove, the choice is yours), and the oil tank has a couple of hoses going in. I prefer not to disconnect any hoses I don't have to, so I left everything hanging off the side.

Remove the battery and then remove the two large bolts that hold the air intake in place. Once removed, gently pull the entire unit upwards so it pops off the throttle body. There are hoses attached, so just move it to the side and let it hang on the hoses.

Next, disconnect the throttle cable from the throttle body. You will remove it completely later on. There are two possible locations for the cable, so I marked the right one with a marker.

Next, remove the battery tray (two torx bolts) and slide it away.


Then you'll have to remove the throttle cable completely in order to remove the plastic shield that is in front of the frame.

Once gone, you can see most of the vale cover.

Disconnect the coolant overflow reservoir (one torx) and slide it outwards. I hung mine off the handlebars with a ziptie.

Cover your throttle body (a nitrile glove works rather well). Then disconnect two hoses (lower one is just pushed on, upper has a hose clamp) and three electric connectors. Unscrew two torx bolts on the manifold, and lift the throttle body off the bike.

Done.


Now you have complete access to the valve cover. All that is left is to remove the two spark plugs. Each one has a specific coil, so mark which one goes where, if you are not sure that you'll remember.

Next, grab your 10mm socket and some extensions, and undo the valve cover bolts. I like to put the same bolts to the holes they came from, so I marked the heads with a sharpie, and marked the corresponding numbers on a piece of masking tape. This way, if a thread was slightly damaged or a bolt was bent by someone in the past, the same bolt will go in the same place, minimizing future damage. (dealt with that a lot on old bikes)

Voila, ready for checkup.
G650GS (F650GS single) valve check
This is one of those maintenance items that has to be done, yet, for some strange reason, I've been really dreading to do it. Normally, I do all my engine work on my bikes, but I've been reluctant to dive into the BMW. Why? I'm not sure. After all, it is a machine and like all machines it can be serviced. So, here I was at 12k miles, thinking about paying the dealer $300 for valve check and whatnot, and then I decided to do it myself.
At first look, the layout of the BMW is a little intimidating, I'll admit that. Unlike all my previous bikes, this one has way too many electronic gizmos, hoses, tubes, and things are rather inaccessible. So, I took my time and started slowly, taking pics along the way. This will be a two-post series dealing with valve check on a BMW 650GS single cylinder, two spark motor. IIRC, this is the same for 04-07 F650GS and 09 G650GS, along with a few other models using the same motor.
First step in doing almost anything maintenance related on this bike is to remove the plastic covers. A few torx bolts and it's done, so there is no need for pics.
Next, remove the oil tank by unscrewing one Torx bolt and removing two clips. At the same time, remove air intake snorkel. The snorkel has a clipped in temp sensor (leave it in place or remove, the choice is yours), and the oil tank has a couple of hoses going in. I prefer not to disconnect any hoses I don't have to, so I left everything hanging off the side.
Remove the battery and then remove the two large bolts that hold the air intake in place. Once removed, gently pull the entire unit upwards so it pops off the throttle body. There are hoses attached, so just move it to the side and let it hang on the hoses.
Next, disconnect the throttle cable from the throttle body. You will remove it completely later on. There are two possible locations for the cable, so I marked the right one with a marker.
Next, remove the battery tray (two torx bolts) and slide it away.
Then you'll have to remove the throttle cable completely in order to remove the plastic shield that is in front of the frame.
Once gone, you can see most of the vale cover.
Disconnect the coolant overflow reservoir (one torx) and slide it outwards. I hung mine off the handlebars with a ziptie.
Cover your throttle body (a nitrile glove works rather well). Then disconnect two hoses (lower one is just pushed on, upper has a hose clamp) and three electric connectors. Unscrew two torx bolts on the manifold, and lift the throttle body off the bike.
Done.
Now you have complete access to the valve cover. All that is left is to remove the two spark plugs. Each one has a specific coil, so mark which one goes where, if you are not sure that you'll remember.
Next, grab your 10mm socket and some extensions, and undo the valve cover bolts. I like to put the same bolts to the holes they came from, so I marked the heads with a sharpie, and marked the corresponding numbers on a piece of masking tape. This way, if a thread was slightly damaged or a bolt was bent by someone in the past, the same bolt will go in the same place, minimizing future damage. (dealt with that a lot on old bikes)
Voila, ready for checkup.

urbandrag- Cantidad de envíos : 685
Puntos : 5380
Fecha de inscripción : 17/03/2012
Edad : 49

Re: 650GS mono: Chequeo de valvulas (English)
![]() urbandrag 15/3/2013, 08:00
urbandrag 15/3/2013, 08:00
This is just a short post. Easy...easy...
Part II of valve check, which is just how to check the valve clearance.
You'll need feeler gauges, patience, and decent light source.
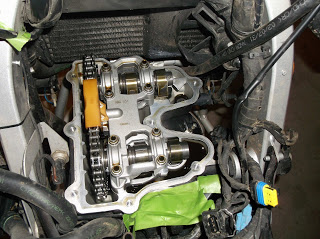
Once you have the valve cover off, rotate the crank so you have the piston in TDC (Top dead center). There are two ways to do this. One way is to remove a plastic plug in side cover and use a large allen wrench. Some models have the plastic plug. Mine, for some reason does not. (First bike I own that doesn't). So, option number two is to kick it in a gear (I went with 4th) and rock the rear wheel in the direction of travel (NEVER otherwise) until your piston reaches TDC. You'll have to remove at least one spark plug to be able to move the piston, otherwise you'd be fighting compression. You'll know that you reached TDC when the valves compress and release, and your camshaft sprocket marks line up. There are four marks, two on each sprocket. It's kinda hard to get the camera in there, but here is the best pic I could get. The marks have to be in line and parallel to the cylinder head. This pics is only for illustration purposes. The bores in the sprockets have to point up.

BMW calls for a special bolt to lock the crank at TDC, but being in gear, I did not feel this was necessary for checking the valves. If I were replacing shims, it would make me feel better to have the crank locked.
Next grab your feeler gauges. You'll need metric feelers. The range spec calls for 0.25-0.33mm on exhaust, and 0.03-0.11mm on intake. THESE SPECS ARE FOR THE TWINSPARK, SINGLE CYLINDER. Try the thickest feeler first, and go down from that until one slides in freely, with a little drag, but no binding.
Gauges insert easily from the inside, like this:


My valve clearances at 12k measured:
Exhaust: Left 0.28mm and Right 0.30mm
Intake: Left 0.06mm and Right 0.08mm
This is well within spec, so I'm leaving it alone.
Now I just have to put everything back together, pop in some new sparkplugs, change the oil, and be set for the next few thousand miles.
I will probably do a post on reassembly, with torque specs.[justify]
Part II of valve check, which is just how to check the valve clearance.
You'll need feeler gauges, patience, and decent light source.
Once you have the valve cover off, rotate the crank so you have the piston in TDC (Top dead center). There are two ways to do this. One way is to remove a plastic plug in side cover and use a large allen wrench. Some models have the plastic plug. Mine, for some reason does not. (First bike I own that doesn't). So, option number two is to kick it in a gear (I went with 4th) and rock the rear wheel in the direction of travel (NEVER otherwise) until your piston reaches TDC. You'll have to remove at least one spark plug to be able to move the piston, otherwise you'd be fighting compression. You'll know that you reached TDC when the valves compress and release, and your camshaft sprocket marks line up. There are four marks, two on each sprocket. It's kinda hard to get the camera in there, but here is the best pic I could get. The marks have to be in line and parallel to the cylinder head. This pics is only for illustration purposes. The bores in the sprockets have to point up.
BMW calls for a special bolt to lock the crank at TDC, but being in gear, I did not feel this was necessary for checking the valves. If I were replacing shims, it would make me feel better to have the crank locked.
Next grab your feeler gauges. You'll need metric feelers. The range spec calls for 0.25-0.33mm on exhaust, and 0.03-0.11mm on intake. THESE SPECS ARE FOR THE TWINSPARK, SINGLE CYLINDER. Try the thickest feeler first, and go down from that until one slides in freely, with a little drag, but no binding.
Gauges insert easily from the inside, like this:
My valve clearances at 12k measured:
Exhaust: Left 0.28mm and Right 0.30mm
Intake: Left 0.06mm and Right 0.08mm
This is well within spec, so I'm leaving it alone.
Now I just have to put everything back together, pop in some new sparkplugs, change the oil, and be set for the next few thousand miles.
I will probably do a post on reassembly, with torque specs.[justify]
urbandrag- Cantidad de envíos : 685
Puntos : 5380
Fecha de inscripción : 17/03/2012
Edad : 49
Re: 650GS mono: Chequeo de valvulas (English)
![]() Lean79 7/8/2019, 08:17
Lean79 7/8/2019, 08:17
Hola. Recién llego a éste Foro.
6 años dsp paso a decirte Gracias x compartir esta info.
Crack!
6 años dsp paso a decirte Gracias x compartir esta info.
Crack!
Lean79- Cantidad de envíos : 1
Puntos : 1736
Fecha de inscripción : 07/08/2019
» GS Mono Valvulas
» Borrar indicación de servicio
» rosca de tapa valvulas barrida
» chequeo del sensor de presion de neumaticos
» Ayuda! problema arranque 650GS monocilindrica
» Borrar indicación de servicio
» rosca de tapa valvulas barrida
» chequeo del sensor de presion de neumaticos
» Ayuda! problema arranque 650GS monocilindrica
Permisos de este foro:
No puedes responder a temas en este foro.|
|
|
» Ayuda: Motor de arranque.
» Cardan y diferencial oxidados - GS r 1200 LC 2018
» puños calefaccionados
» chequeo del sensor de presion de neumaticos
» presentacion
» tecnica que usan los japoneses para giros en baja velocidad
» Para los que se animan a meter mano - Cambio de liquido de frenos en una moto
» como nuevo